16-09-2024, 10:15 AM
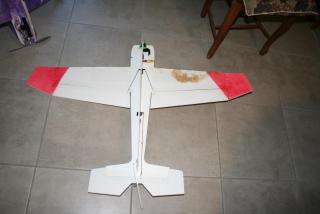
Here is some build notes for the foam board Extra 330. Pictures and a video will follow soon.
1 Using a sharp knife remove all the parts from the foam board sheet. There are tabs to hold the parts in place and sometimes the needle cutter does not go all the way through. With those rough areas the paper edges can be be sanded with fine grit paper.
2 Glue and sticky tape the 5x500mm carbon strip spars to the wing, one slots into the centre and two go along the leading edge overlapping 50mm in the centre. The carbon can be glued together but be careful not to use normal CA against the foam in this build as it will melt it. Foam safe CA is fine.
3 Using the below picture, place out and match the parts to mark the bottom edges of the hinges for bevelling. Using course sandpaper over a bin, bevel all the control surfaces and where they attached to the wing, tail and rudder on the non linkage side. With sticky tape along the top non bevelled side, attach the elevator – tail and aileron -wing parts together. Fold the parts up against each other and do the same on the bottom bevelled side to complete the hinge. Leave the rudder for now as it attached to the fuselage latter.

4 Again referring to the above picture glue the horizontal fuselage part to the wing. The slots and servo cutout will a line together. White wood glue works well and you can use cloths pegs or pins to hold them together when drying. The aileron servo is placed in next using a small amount of glue on the lugs with its horn set in the neutral position.
5 The top vertical fuselage part goes through the rear slot and slides back and down into position to be glued. The elevator servo with its horn set upwards is then placed in on is side from the bottom so that the bottom vertical part can be then glued in. Old school pins work best for when the glue is setting , and the 3d printed engine mount will kept the parts together around the nose. Be shore to use a stronger glue for it. When its dry you can hinge the ruder on with sticky tape but it will be a little harder this time to put the second tape on as the rudder cant fold all the way around to the fin. The rudder servo can now be glued in.
More to come.
srl
1 Using a sharp knife remove all the parts from the foam board sheet. There are tabs to hold the parts in place and sometimes the needle cutter does not go all the way through. With those rough areas the paper edges can be be sanded with fine grit paper.
2 Glue and sticky tape the 5x500mm carbon strip spars to the wing, one slots into the centre and two go along the leading edge overlapping 50mm in the centre. The carbon can be glued together but be careful not to use normal CA against the foam in this build as it will melt it. Foam safe CA is fine.
3 Using the below picture, place out and match the parts to mark the bottom edges of the hinges for bevelling. Using course sandpaper over a bin, bevel all the control surfaces and where they attached to the wing, tail and rudder on the non linkage side. With sticky tape along the top non bevelled side, attach the elevator – tail and aileron -wing parts together. Fold the parts up against each other and do the same on the bottom bevelled side to complete the hinge. Leave the rudder for now as it attached to the fuselage latter.
4 Again referring to the above picture glue the horizontal fuselage part to the wing. The slots and servo cutout will a line together. White wood glue works well and you can use cloths pegs or pins to hold them together when drying. The aileron servo is placed in next using a small amount of glue on the lugs with its horn set in the neutral position.
5 The top vertical fuselage part goes through the rear slot and slides back and down into position to be glued. The elevator servo with its horn set upwards is then placed in on is side from the bottom so that the bottom vertical part can be then glued in. Old school pins work best for when the glue is setting , and the 3d printed engine mount will kept the parts together around the nose. Be shore to use a stronger glue for it. When its dry you can hinge the ruder on with sticky tape but it will be a little harder this time to put the second tape on as the rudder cant fold all the way around to the fin. The rudder servo can now be glued in.
More to come.
srl


