Thread Rating:
  • 1 Vote(s) - 4 Average
  • 1
  • 2
  • 3
  • 4
  • 5

Dyna-Mite Build Log

Thanks Gazz,
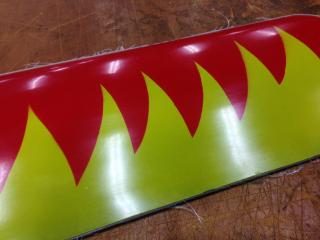
Here's a couple of pics I took of it this morning after it came out of the bag.


This idea of painting in the mould is Just great !! It comes out so nicely and it's really easy to do. I'm sure that it would look even nicer if I was to put down a coat of clear first but I don't want to add any extra weight.


And it's light too and there's still a gram or two to be trimmed off it


Take care Gazz and if you need anything brought over just let me know Maqurie is on my way too and from work.


“The knack of flying is learning how to throw your machine at the ground and miss.”

"When once you have tasted flight, you will forever walk the earth with your thoughts turned skyward, for there you have been, and there you will always long to return."  ~Leonardo Da Vinci
Reply

Thanks Jason
I am probably going home this evening, but thanks for the offer.
I think a test piece with clear on it is worth a try mate. I recon the gloss would make the "out of mould finish" look heaps better, and it will only add a few grams
I hope to drop by the field on the weekend, so I might catch up then.

Parkzone Stryker 27 Evolution
E flite Ultra Stick , T 28 Carbon Z
Skyartec Skyfun Scorpion,Skyfun 90 EDF
Hobbyking Voltigeur, Funfighter T28, Mirage 2000, Minimoa 2.4m Glider
Jet Teng L-39 HPAT Stumax 90
Pheonix Tiger 50
FliteWork Extra 300 LPX 2.6M
Spectrum DX9i , DX6

Don't ever let the fear of landing keep you from taking off!
Reply

No worries Gazz !!
Hope all goes well and you do get home tonight. It's so much better being at home.

Might see you at the field if the weather holds.
Glass cloth, as anyone who has ever handled it knows, frays and pulls out of shape very easily!! Thin glass cloth is even more fragile.
What I do to keep the thin stuff in good shape is: When I go to buy some, I take a piece of plastic sheet with me slightly larger than the glass I want to buy.
When they cut it off a roll, at the shop, instead of folding it up, I ask them to lay it on the plastic and roll it up for me.

When I come to use it later, It’s very easy to unroll and I can slide it along the bench without catching it and pulling a ladder in it.


I rarely ever use scissors to cut cloth. Mostly I use a straight edge and a knife or use a Knife around a template. I cut straight through
the plastic backing layer as well then the whole thing rolls up neatly for storage again when I’m done. This way I mostly avoid the inevitable fur-ball
that can easily happen when handling glass cloth.


One trick I recently learned is using Paper to soak up the excess resin and take it away, Since the plastic sheets are pretty flat at the layup stage I’ve taken to simply pressing the roll of dunny paper down on it as I unroll it, It’s quick and it works a treat. The paper peels off easily without lifting the glass.
I repeated the process until the paper comes off dry. There is more than enough resin left in the cloth to bind it fast to the foam core after it’s been vac-bagged !!


Here’s wing no3 in the bag. I’ll have to find a better material to make stencils for painting from, for this one I just used A4 paper and it didn’t quite produce the result I was after.


For the previous wing I used R 180 Resin from FGI, the wing before that was made using WEST systems epoxy and for this wing I was kindly given some LY 191 resin to try out By Steve H

For a comparison between the Three, West and R180 were very similar to use, west might be very slightly thinner if I had to choose between the two, The LY 191 was noticably thinner than the other two and more easily spread and quicker to wet out the cloth. I think it came out of the cloth a little better when I blotted the lay up with toilet tissue. All three resins were used at 22 degrees C. I think the the LY 191 did take a little longer to gell which gives it a bit more working time which is handy too.


“The knack of flying is learning how to throw your machine at the ground and miss.”

"When once you have tasted flight, you will forever walk the earth with your thoughts turned skyward, for there you have been, and there you will always long to return."  ~Leonardo Da Vinci
Reply


I took the prototype for a fly today. I thought I would try a new Graupner 4.7x4.7 prop and see how it went.
Unfortunately I only managed to get one flight as I landed badly, a foot short of the end of the strip in the weeds and damaged the wing mount. Nothing major, it will go back together in very short order but enough to stop me having any more flights. The wind was getting pretty bad as well.

The good news is that it's much quieter with the Graupner prop. and I think it's noticeably faster as well. I can't say for sure about the speed as I didn't get any video to do a Doppler analysis on. but it just felt and looked like it was going harder.

I'll fix it up during the week and hopefully give it another go next weekend.

“The knack of flying is learning how to throw your machine at the ground and miss.”

"When once you have tasted flight, you will forever walk the earth with your thoughts turned skyward, for there you have been, and there you will always long to return."  ~Leonardo Da Vinci
Reply

interesting stuff . where do you buy the graupner props from ?

patience !!Biggrin paaatience !!Paranoid paaaaaatience Tounge paaaaaaatieeence Lol dooooohhhh !!! Upset


DANGER WIFE CAN READ FORUMS . love you darling . sig changed .
Reply

Graupner props were from here,

http://www.electricwingman.com/power/propellers.aspx

If your going to order some let me know and I'll grab a few as well and split the postage with you.

They are such nice props!!! I use the the 10x6 on my Q-500 and it goes really well. I've just got to fly a better line with it Smile


“The knack of flying is learning how to throw your machine at the ground and miss.”

"When once you have tasted flight, you will forever walk the earth with your thoughts turned skyward, for there you have been, and there you will always long to return."  ~Leonardo Da Vinci
Reply

Peter Pine also sells speed props.
He is recognised as being the one of the fathers of electric flight in Australia. I have bought a lot of bits and pieces from him.
His prices are pretty respectable too.
His website has a lot of interesting reading for new and experienced pilots.

http://www.flyelectric.com/index.html

Parkzone Stryker 27 Evolution
E flite Ultra Stick , T 28 Carbon Z
Skyartec Skyfun Scorpion,Skyfun 90 EDF
Hobbyking Voltigeur, Funfighter T28, Mirage 2000, Minimoa 2.4m Glider
Jet Teng L-39 HPAT Stumax 90
Pheonix Tiger 50
FliteWork Extra 300 LPX 2.6M
Spectrum DX9i , DX6

Don't ever let the fear of landing keep you from taking off!
Reply

Thanks Gazz,

I see he has, the one I used, listed as well !! Smile

“The knack of flying is learning how to throw your machine at the ground and miss.”

"When once you have tasted flight, you will forever walk the earth with your thoughts turned skyward, for there you have been, and there you will always long to return."  ~Leonardo Da Vinci
Reply

I put another wing in the bag early this morning, one more to go and I've run out of cores. The next lot I cut I might make the wing span slightly more perhaps another 1.5 inches.

Here's a pic of the latest one under vacuume.


“The knack of flying is learning how to throw your machine at the ground and miss.”

"When once you have tasted flight, you will forever walk the earth with your thoughts turned skyward, for there you have been, and there you will always long to return."  ~Leonardo Da Vinci
Reply

And here it is just out of the bag with the plastic sheet peeled off this morning.
   

It's also the lightest one yet


“The knack of flying is learning how to throw your machine at the ground and miss.”

"When once you have tasted flight, you will forever walk the earth with your thoughts turned skyward, for there you have been, and there you will always long to return."  ~Leonardo Da Vinci
Reply


And here is the last one just out of the bag.
I havn't weighed it yet.


How long does it take to make a wing like this ???

I worked out that once a few things are in place It's not difficult to make a finished wing with ailerons cut in and hinged, painted the whole lot, ready for fitting servos in about 3.5 - 4 hours. This is from from scratch and includes making and prepairing the cores, cutting the glass, painting and laying it all up.

But doesn't include making the templates to cut the cores or making the wire cutter or the jig to hold the templates or the Vac-bag or the stencils for painting or the shaping of the plastic sheets for forming the wing skins. It also doesn't include the time taken to reasearch and source materials. These things all have to be done but only once regardless of the number of wings made.

It obviously doesn't include time inbetween paint drying and resin curing as other things can be done then.


“The knack of flying is learning how to throw your machine at the ground and miss.”

"When once you have tasted flight, you will forever walk the earth with your thoughts turned skyward, for there you have been, and there you will always long to return."  ~Leonardo Da Vinci
Reply

Did a bit more testing with the Prototype on the weekend.
With Claudio expertly manning the camera I was able to use some of the video to get a Doppler measurement of the speed with the new Graupner prop and as I thaught it was going a bit quicker but the real improvement was with the noise. It's really very much quieter with this prop.

Here's some of the video

Best watched in 720HD even so it’s small and rather quick.

http://www.youtube.com/watch?v=NRFS3fwa7nI


And here’s the edited video of two of the three flights of the day

http://www.youtube.com/watch?v=5O_YDnaMovY

“The knack of flying is learning how to throw your machine at the ground and miss.”

"When once you have tasted flight, you will forever walk the earth with your thoughts turned skyward, for there you have been, and there you will always long to return."  ~Leonardo Da Vinci
Reply

WELL DONE MATE . nice vids too .

patience !!Biggrin paaatience !!Paranoid paaaaaatience Tounge paaaaaaatieeence Lol dooooohhhh !!! Upset


DANGER WIFE CAN READ FORUMS . love you darling . sig changed .
Reply

Thanks 'tipper Smile

Here are the plugs for the wing center fairing and the left & right servo fairings. The servo fairings on the the proto type were made by assembeling two seperate fairings together these ones are all in one peice. The prototype still doesn't have a wing center fairing so the first one out of the mould will go on there. It should make it a little slipperier.

Hopefully the won't be to hard to lay up. The center fairing should be no drama at all.

Just a couple more coats of wax then some PVA and I'll be ready to take moulds from the plugs. The finish is Upol reface. I found out that VG auto paints have it in 1 L tins for about $55.00 Unfortunatly I didn't know this and got a 2.5L tin...... It'll find it self a use tho Smile these things allways do


“The knack of flying is learning how to throw your machine at the ground and miss.”

"When once you have tasted flight, you will forever walk the earth with your thoughts turned skyward, for there you have been, and there you will always long to return."  ~Leonardo Da Vinci
Reply

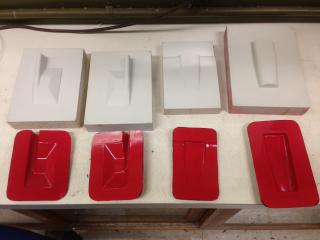
I made up the 4 moulds yesterday evening using the 3 plugs pictured in my last post and the plug for the front Hatch, I have already made a mould for that but the finish on it is not so great so I thaught while I was at it, I might as well do that one again at the same time.


The good thing about making composite parts is that once you have a good plug it is very easy to make a mould and once you have a mould it's even easier to make the parts from it.
If the mould gets damaged or wears out, it’s a simple matter to go back and make another mould from the plug.

The Key to success with any fibre glass work is planning. Everything must be ready, all the glass must be measured and cut and set out in the order it goes on. All the tools, fillers, brushes, hand-towl, gloves ect, must be on hand before the resin is mixed. If there’s anything tricky about the job, have a plan B in place as well. Once the resin is mixed, it’s starting to cure and everything must be done before that happens.

The plugs were prepared with 6 coats of TR-8 silicon free mould release wax, rubbed on and then rubbed off again. Then three spray coats of PVA mould release on top of that.

I used this little spray gun I got from Ebay for $32 including postage. http://www.ebay.com.au/itm/181116094682?...K:MEWNX:IT&_trksid=p3984.m1439.l2649

.jpg Dyna 177.JPG Size: 14.9 KB  Downloads: 400


It’s not a superb spray gun and the fan spray pattern is a little bit denser on the bottom than on the top but it does a nice enough job if it’s carefully adjusted, for the money it’s good value.
It’s not the one I used to spray the Upol-reface, this gun only has a 0.8 mm nozzle and you need a 2.5 for the Upol. The smaller nozzle is better for spraying thin stuff like PVA

There are many ways to make moulds but this the way I went about it.

Once the plug is prepared as above
All you do is mix up some gel-coat and paint it thickly on the plug. When the gel-coat is solid but still tacky mix up some resin. Pour a small amount of mixed resin aside and add some filler to make a stiff bog that won’t slump. A good filler for this is “west systems microfiber blend”, spatula this into any tight corners where it’ll be hard to work the glass cloth into. Once this is done, using the rest of the resin begin by laying up a couple of layers of light cloth either 3 or 4 Oz. Then a couple of 6 Oz then some heavier stuff to back it with, use either cloth or chopped strand mat. Wet it out between the layers and stipple it down with a brush. The layup I used totalled about 60 Oz per sq ft when the cloth ws added up. The thicker glass cloth on the back was fire blanket that I had left over from another job. But a couple of layers of 24 oz, or 4 of 12 Oz would do. Biaxial cloth could also be used, it is good because it’s thick and it will still take a shape quite nicely where as heavy woven cloth is a bit harder to coerce into and around corners.

The moulds were made using polyester tooling gel and polyester laminating resin. The parts that will be moulded from them will made using epoxy resin.

These moulds were a bit of a trial as I’d never used Upol-reface as a finish for a plug before. I hadn't forgotten the enamel debacle, which cost me quite a bit of time, so it was with more than a little trepidation, that I gently pried the moulds from the plugs. I was really very happy to see that they all worked extremely well. There were a few places where I had put the gel-coat on a little thin, this shows up slightly in the colour of the moulds but has, in no way effected the surface finish. I certainly can’t blame the Upol reface for that. All in all, it worked brilliantly !! I will definitely be using it again.


All that was left to do was to mark out the flange of the moulds and cut the edges to shape


Here’s a pic of the finished moulds and their plugs.
   

“The knack of flying is learning how to throw your machine at the ground and miss.”

"When once you have tasted flight, you will forever walk the earth with your thoughts turned skyward, for there you have been, and there you will always long to return."  ~Leonardo Da Vinci
Reply

The fuse plug is almost ready for waxing it just needs a little more work with 800 grit and it's good to go.

I decided to make a quick, easy and much better way to hold the fuse plug while it’s being sprayed with the PVA release agent.
Because this plug has to be painted all over, previously It'd hung it vertically when I sprayed it with the Upol reface. Spraying something hanging vertically like that with no support isn't much fun. The spray gun pushed out a lot more air than a spray can and I ended up chasing the fuse plug around trying to get some paint on it. This was not at all conducive to a good finish and meant a lot more sanding. The fact that it was hanging vertical didn't help either, it made it quite hard to spray.


So this is the solution, It didn't take very long about 20 mins, (which is less than half the time I spend sanding rough paint). It’s made from some old scrap timber lying about and a couple of screws. The shaft is a piece of steel tube with a brass self-tapping screw soldered in the end, the support on the other end is just a self-tapping screw. I drilled a hole in either end of the fuse plug and wound them in. The ends sit in V shaped notches cut in the timber and the shaft end has a clamp screwed down on top of it to provide enough friction to make it stay put. The toolie’s clamp on the end of the shaft is just there to act as a handle so I can rotate it easily for painting. I wish I did this a lot earlier, It would have made life a lot easier !!


“The knack of flying is learning how to throw your machine at the ground and miss.”

"When once you have tasted flight, you will forever walk the earth with your thoughts turned skyward, for there you have been, and there you will always long to return."  ~Leonardo Da Vinci
Reply

I had 6 flights with the Dynamite prototype today, It was going very well, Steve H, Adrian and I were racing three similar models around the sky and having a lot of fun.
Steve’s Bandit, The Dynamite and Adrian's Interceptor are fairly closely matched as far as speed goes and they are all about the same size. So that made things very interesting. It was exciting to fly with them in the air as well. Great stuff !!

It was all heart pumping fast and furious action until, the last flight when Adrian and I were flying long circuits with fairly hard and tight turns at each end. I think what happened was Adrian went long and turned back while I was still going out and both models met head on. There was an enormous crash as the Dynamite and the Interceptor impacted against each other with a closing speed of over 400 kilometres per hour. I’ve never seen anything like it. Pieces went in several different directions. From the recovered wreckage it seemed that the wings had come together. The Dynamite’s wing was recovered but suffered damage beyond repair, the main structure of the spar still had it’s integrity but the impact has really damaged the foam core around the rest of the wing. The port aileron servo was smashed to pieces all that remained with the wing was part of the circuit board and the bottom of the servo’s plastic case. The Dynamites fuse is undamaged save for a broken engine mount and the prop is missing it’s blades. Adrian's interceptor lost it’s canopy and about 1/3 of it’s port wing. The horizontal stab didn’t look very serviceable either but almost everything from both models was recovered.

“The knack of flying is learning how to throw your machine at the ground and miss.”

"When once you have tasted flight, you will forever walk the earth with your thoughts turned skyward, for there you have been, and there you will always long to return."  ~Leonardo Da Vinci
Reply

Here's some pics of the Damage to The Dynamite.
It shows the enormous strength of this type of construction.

Looking at this I can understand why the wing doesn't ever flex in those tight turns, it does so well.

Here's the wing, at zone 4, is where it impacted with Adrians intecepter wing.
The foam is compressed and broken but it's taken a bit of the impact energy. The wing was torn clean off it's mounts this would have absorbed a bit of energy as well as partially releasing it from the inerta of the fuse, which is the heaviest part.

The outher skin has been damaged at zones 1 and 2 Classic compression failier at 2 and it extend into the aileron. This is failier of the core, being crushed, as the wing has been folded at this point. At 1 the skin has delaminated from the core and buckled up as it's been compressed due to the same folding of the wing. There is little damage where the wing has been spared.

I had to put a fair bit of force on it to show these failiers for the photo if I let it go the wing just sprang back to where it was originally.

There is a crack in the middle of zone 3 right allong the edge of the spar but I think this is impact damage and the skin has failed locally in sheer directly near where it's been hit as there is no sign of delamination. There is more impact damage further back from the spar at 3.

You can also see the remains of the dissassembeled servo left in the wing. The servo originally protruded from the underside of the wing by about 3mm and that was enough to catch and have most of it torn away. The other servo was stripped and the controll horn was torn from the aileron. Tho' there was no sign of impact damage on that side. Perhaps it was inerta, I've seen this before and wondered about that ??


Here's the other side of the wing You can see where the leading edge made contact and damage on the other side of zone 3


here's fuse relitivly unscathed


“The knack of flying is learning how to throw your machine at the ground and miss.”

"When once you have tasted flight, you will forever walk the earth with your thoughts turned skyward, for there you have been, and there you will always long to return."  ~Leonardo Da Vinci
Reply

Here’s the fuse plug all waxed up ready to go.


I was going to spray it with PVA on the rotating jig and redo the parting board. Then I thought just a minuet I have already made the parting board and with a little luck it might still fit the plug. When I checked this out it was pretty good and only needed a touch with a file in one place to get it to fit nicely. You've got to be lucky some times at least. the parting board was originally going to be one piece, but when it stuck to the enamel painted plug I had to split it in two with the bandsaw to separate it. I've put it all back together, and with a few extra screws holding it to the backing board It’s all starting to look good. A few coats of Wax on the parting board then some plasticine in the bandsaw cut and I’ll spray the whole assembly with PVA, ready to do the first side of the mould.

Here’s a pic of the parting board as it was when It came off the plug. It was made by cutting the rough shape of the plug out of the centre of one piece of timber. The edge of this hole was roughly chamfered by about 6mm then the plug was put in, so that the centre line of the plug was in line with the face of the board. The plug was held at the right height with plasticine underneath. Then a bog made from epoxy and q-cell was spatulared into the gap between the plug and the board and when it was cured it took the exact shape of the plug. when I was putting the bog onto the gap between the parting board and the plug I left the bog just a little higher than the surface of the board so that I could easily sand it flush after it cured and create a nice flat parting line.


Here it is all together ready for spraying with PVA


“The knack of flying is learning how to throw your machine at the ground and miss.”

"When once you have tasted flight, you will forever walk the earth with your thoughts turned skyward, for there you have been, and there you will always long to return."  ~Leonardo Da Vinci
Reply

Here’s the start of the fuse mould.
The plug together with the parting board has been painted with gel-coat after that’s hardened but still tacky, then 2 layers of 6 Oz cloth then 3 layers of 15 Oz Tri Axial cloth.


Here it is removed from the parting board


Now it’s rouhly trimmed up ready for waxing some plasticene and then a spray with PVA before laying up the othe side. both sides will have a final trim together after side 2 is lated up.


“The knack of flying is learning how to throw your machine at the ground and miss.”

"When once you have tasted flight, you will forever walk the earth with your thoughts turned skyward, for there you have been, and there you will always long to return."  ~Leonardo Da Vinci
Reply

Here's the Fuse plug with Plasticine to mask a couple of places where I don’t want to get any Gel-coat or resin running into.
I’ve also use plasticine to form an edge along the wing saddle which may make it a little easier to do. I just formed it up with bog on side one and it took a bit of doing.

Now all it needs is 3 coats of PVA and it’ll be ready to lay up side 2


Here’s some parts from the fairing and Hatch moulds I sprayed them with PVA at the same time as I sprayed side one of the fuse plug, no point in cleaning the gun twice.


“The knack of flying is learning how to throw your machine at the ground and miss.”

"When once you have tasted flight, you will forever walk the earth with your thoughts turned skyward, for there you have been, and there you will always long to return."  ~Leonardo Da Vinci
Reply

Here’s the start of side 2 of the fuse mould, Just been painted with a good thick layer of tooling gel-coat.


Once the gel-coat has set but is still tacky, some bog made from Polyester laminating resin mixed with West systems microfiber blend, is pushed into the sharp corners where it would be hard for the glass to go. Remembering to put some around where the guide pins go.


Smooth it out a bit with a shaped stick

   
Paint it with resin and start laying up the cloth starting with some light stuff to hold it all together.


Then finishing up with 3 layers of heavy tri-axial to make it nice and stiff


“The knack of flying is learning how to throw your machine at the ground and miss.”

"When once you have tasted flight, you will forever walk the earth with your thoughts turned skyward, for there you have been, and there you will always long to return."  ~Leonardo Da Vinci
Reply

Here's the mould just after it was opened and the plug taken out. It still has the PVA in the mould cavieties


Here it is all trimmed up with clamping screws holes drilled in


And here's a couple of pics of it back together, all trimmed up and with the plug out.


And here's another hatch, just out of the mould you can see the film of PVA as it's peeled out of the caviety.


“The knack of flying is learning how to throw your machine at the ground and miss.”

"When once you have tasted flight, you will forever walk the earth with your thoughts turned skyward, for there you have been, and there you will always long to return."  ~Leonardo Da Vinci
Reply

great stuff . looking forward to see how the mould creates a fuselage now .

patience !!Biggrin paaatience !!Paranoid paaaaaatience Tounge paaaaaaatieeence Lol dooooohhhh !!! Upset


DANGER WIFE CAN READ FORUMS . love you darling . sig changed .
Reply

(14-08-2013, 03:14 PM)wingtipper Wrote:  great stuff . looking forward to see how the mould creates a fuselage now .

Mee too It allready has one coat of Wax on it from lunch time and it'll ge another as soon as I bundy off then a couple before 8:30 tomorrow morning. If I can get PVA on it tomorrow arvo I might be able to lay one up on friday morning.


“The knack of flying is learning how to throw your machine at the ground and miss.”

"When once you have tasted flight, you will forever walk the earth with your thoughts turned skyward, for there you have been, and there you will always long to return."  ~Leonardo Da Vinci
Reply

Here's the first GRP Dynamite fuse layed up in the new mould

It's epoxy resin with two layers of 4oz plain weave cloth all over and a third layer from about the C of G forward.

Hopefully it will come out of the mould nicely, will have to wait 'till monday to find out


and a view from the nose looking through the middle


“The knack of flying is learning how to throw your machine at the ground and miss.”

"When once you have tasted flight, you will forever walk the earth with your thoughts turned skyward, for there you have been, and there you will always long to return."  ~Leonardo Da Vinci
Reply

Nice work Jason, looking forwrd to seeing Mark 2.

Parkzone Stryker 27 Evolution
E flite Ultra Stick , T 28 Carbon Z
Skyartec Skyfun Scorpion,Skyfun 90 EDF
Hobbyking Voltigeur, Funfighter T28, Mirage 2000, Minimoa 2.4m Glider
Jet Teng L-39 HPAT Stumax 90
Pheonix Tiger 50
FliteWork Extra 300 LPX 2.6M
Spectrum DX9i , DX6

Don't ever let the fear of landing keep you from taking off!
Reply

(16-08-2013, 03:59 PM)gbanger Wrote:  Nice work Jason, looking forwrd to seeing Mark 2.

Thanks Gazz Smile

For anyone interested in buying the NTM motor I'm using in the Dynamite 28-36-3000KV 755 W (yes that is 755 W no wonder it shifts along)

Here is the Buddy code from HK makes it about $14 instead of $17

http://www.hobbyking.com/buddy.asp?code=...FCF2CE907A

“The knack of flying is learning how to throw your machine at the ground and miss.”

"When once you have tasted flight, you will forever walk the earth with your thoughts turned skyward, for there you have been, and there you will always long to return."  ~Leonardo Da Vinci
Reply

I opened the mould this morning, It didn’t take much effort at all. That PVA works pretty well, stayed with the fuse and let go of the waxed mould very nicely.
Here’s a pick of the freshly opened mould.
   

Here it is free of the mould
   

And the view from above.
   

Here’s what it should look like when the hatch, wing, fairing and tail are on.
   

The Hole just aft of the trailing edge is covered by another hatch which provides easy access to the elevator servo.

The fuse is quite roomy inside and there will be plenty of room to move battery packs fore and aft to get the correct C of G with different motor options.


“The knack of flying is learning how to throw your machine at the ground and miss.”

"When once you have tasted flight, you will forever walk the earth with your thoughts turned skyward, for there you have been, and there you will always long to return."  ~Leonardo Da Vinci
Reply

Here's the former that that connects and aligns the wing to the fuselage. It's really easy to get this to line up spot on.

You just have to follow the steps.
clamp and drill the two plywood pieces together, the dowel plate that is bonded onto the wing and the former that is bonded into the fuse. Fit the dowles and glue them into the plate that gets bonded to the wing. check that they both fit together snugly, they should, having being drilled together.


Trial fit them to the fuse

Here's the two pieces together being trial fitted in the fuse


“The knack of flying is learning how to throw your machine at the ground and miss.”

"When once you have tasted flight, you will forever walk the earth with your thoughts turned skyward, for there you have been, and there you will always long to return."  ~Leonardo Da Vinci
Reply


Forum Jump:


Users browsing this thread: 2 Guest(s)